Archive
- March 2024 (1)
- February 2024 (2)
- January 2024 (1)
- November 2023 (1)
- July 2023 (1)
- May 2023 (1)
- February 2023 (1)
- April 2021 (2)
- February 2021 (2)
- January 2021 (6)
- October 2020 (4)
- September 2020 (3)
- August 2020 (6)
- July 2020 (5)
- June 2020 (4)
- May 2020 (6)
- April 2020 (7)
- March 2020 (5)
- February 2020 (5)
- January 2020 (5)
- December 2019 (5)
- November 2019 (6)
- October 2019 (5)
- September 2019 (1)
- March 2018 (10)
- February 2018 (7)
- January 2018 (10)
- December 2017 (7)
- November 2017 (7)
- October 2017 (10)
- September 2017 (8)
- August 2017 (10)
- July 2017 (8)
- June 2017 (9)
- May 2017 (13)
- April 2017 (10)
- March 2017 (10)
- February 2017 (10)
- January 2017 (11)
- December 2016 (12)
- November 2016 (16)
- October 2016 (15)
- September 2016 (5)
- August 2016 (17)
- July 2016 (15)
- June 2016 (16)
- May 2016 (19)
- April 2016 (12)
- March 2016 (20)
- February 2016 (17)
- January 2016 (21)
- December 2015 (20)
- November 2015 (7)
- October 2015 (1)
- September 2015 (1)
- July 2015 (7)
- June 2015 (2)
- May 2015 (1)
- April 2015 (1)
Build a Treat Station with Deflecto Stackable Storage!
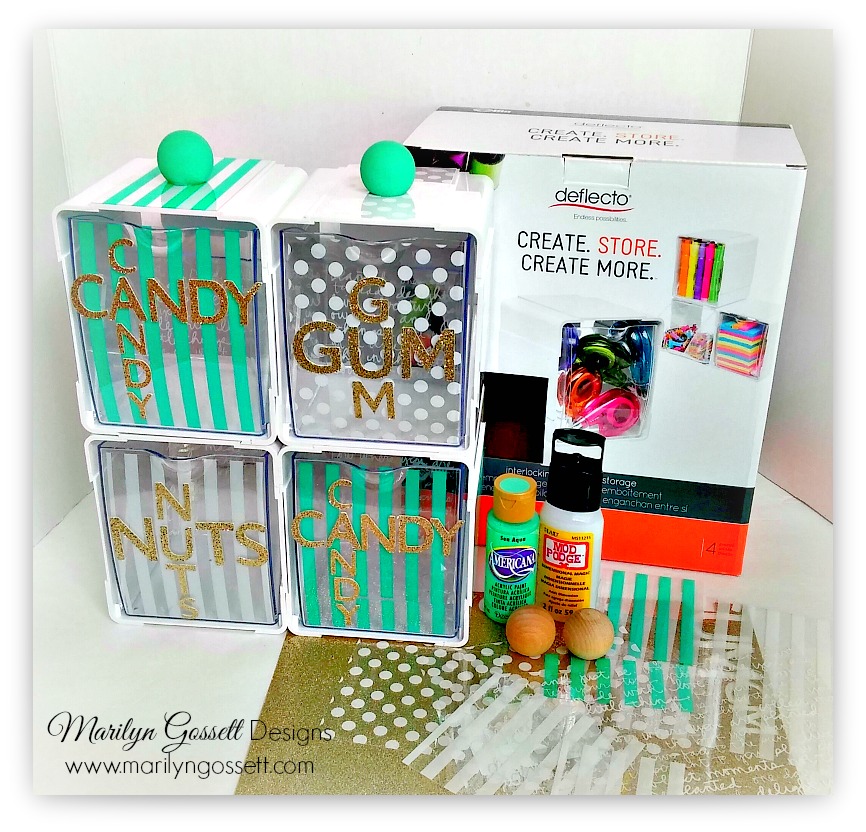
Deflecto: interlocking stackable storage (4 bins in unit)
Acetate scrapbook paper: I used four different designs of 8-1/2″ x 11″ papers
Americana Acrylic Paint by DecoArt: Sea Aqua (to match the papers)
Wooden Ball Knobs: two 1-1/4″
Mod Podge: Dimensional Magic by Plaid (for gluing)
Glitter cardstock: 12″ x 12″ gold
Die cutting machine (Cricut) to cut letters
Paper trimmer
Ruler
Paintbrush, two 1/4″ dowels (for paint handles)
Adhesive tape runnerYou will need:
Here is the finished project! Next, I will tell you how I did it.

1. For each drawer: Use the ruler to measure the height and width of the front of one bin drawer. Cut the acetate to fit; apply small dots of adhesive to the right side of the acetate, top and bottom. Adhere to the inside of the bin drawer. Cut a contrasting paper to fit the inside of the back of the drawer. I used an acetate with a cursive design on it. This is just to add a little dimension. Repeat for all four drawers. Cut extra pieces of acetate to further decorate the top and sides of the unit if desired.
2. Die cut the letters from the glitter cardstock. My largest letters are 1-1/2″ The smallest are 3/4″. Make sure all of the cut letters fit on the bin drawer before you glue them down. You will adhere them directly to the acrylic bin drawer as shown. Use the Mod Podge dimensional magic as the adhesive for adhering the letters. Apply small dots of adhesive to the acetate paper to adhere each piece to the acrylic.

3. This is what the wooden knobs look like before you paint them. Make sure you like the way they look on your treat station. Some may prefer to leave it plain.

5. Adhere the knobs to the top of the treat unit as shown using a dab of the dimensional magic adhesive for each.